[Big News]Brorsoft's iPhone Data Recovery Entitled iRefone Released - 50% Discount Off

[Big News]Brorsoft's iPhone Data Recovery Entitled iRefone Released - 50% Discount Off
Get Brorsoft iRefone for Windows and Mac by joning Brorsoft Facebook Community activities. Click Like button, you can get 50% Off Promo Codes.

Monday, December 28, 2015

L840 MOV to WMV - Edit Nikon Coolpix L840 H.264 files in Windows Movie Maker

To fix Nikon COOLPIX L840 h.264 MOV and Windows Movie Maker incompatibility issues, the best bet is to convert MOV to Windows Movie Maker supported file formats like WMV. Here is how.

Long zoom, a fast-handling design, plus built-in Wi-Fi and NFC, all come together in the Nikon Coolpix L840 Wi-Fi Digital Camera to help you take your photos and videos to the next level. With Nikon L840, you can record your videos at a highest resolution of 1920 x 1080 and save in MPEG-4 and H.264 formats. Full HD resolution of Nikon L840 will be adequate in most of the situations.

Usually we can access Nikon DSLR H.264(.mov) always can't be supported by Windows Movie Maker. One option is to install the H.264 codec, problems may be resolved. Another workaround is to convert L840 H.264 MOV files to Windows Movie Maker friendly format like WMV.


Brorsoft Video Converter is the right tool for you.

Overall, it is the best H.264 MOV to Windows Movie Maker converter. It can help you transcode Nikon H.264 MOV to Windows Movie Maker friendly videos WMV, AVI, etc. with high output video quality. What's more, it is also professional in making DivX, XviD, XAVC, MPG, AVCHD, VOB, MP4 files editable in Adobe Premiere Pro, Adobe Premiere Elements, Avid Media Composer, Sony Vegas Pro, After Effects, Pinnacle Studio, CyberLink PowerDirector, etc to meet your different needs. Download it now and follow the steps to convert your Nikon Coolpix L840 H.264 videos to Windows Movie Maker for editing.

Download H.264 MOV file converter:


How to Convert Nikon Coolpix L840 H.264 MOV video to Windows Movie Maker

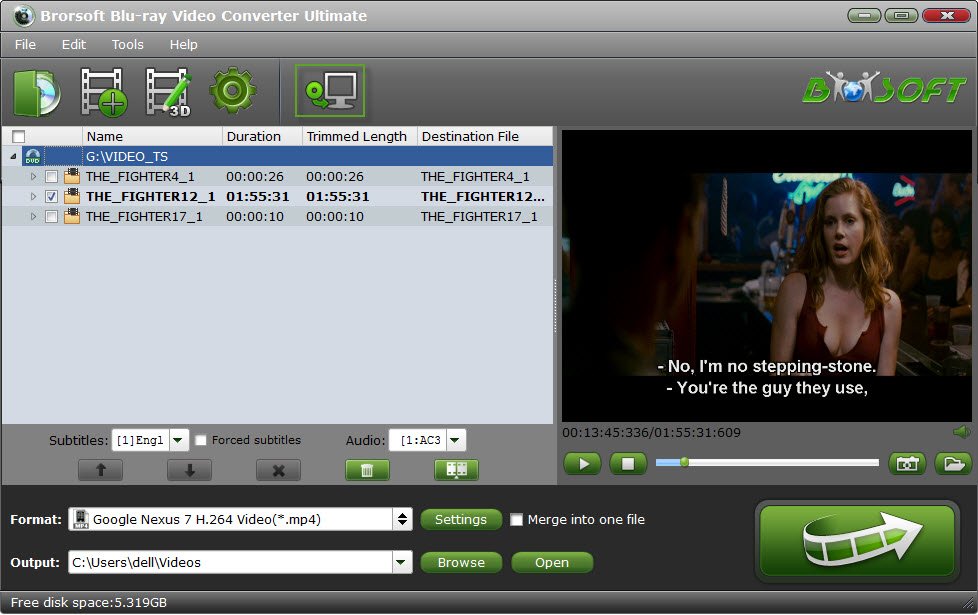
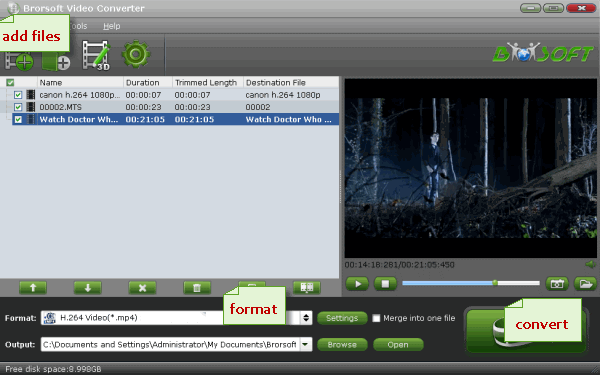
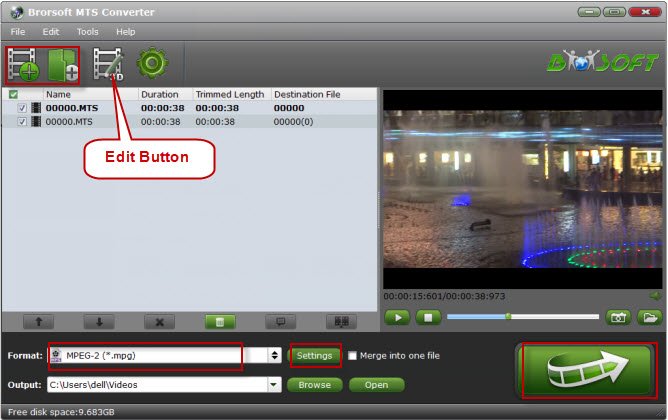
Step 1: Install and run the H.264 to Windows Movie Maker Converter, and then click the "Add" button to load the L840 H.264 MOV videos. You can also use the drag-and-drop method to load the media files to the program.


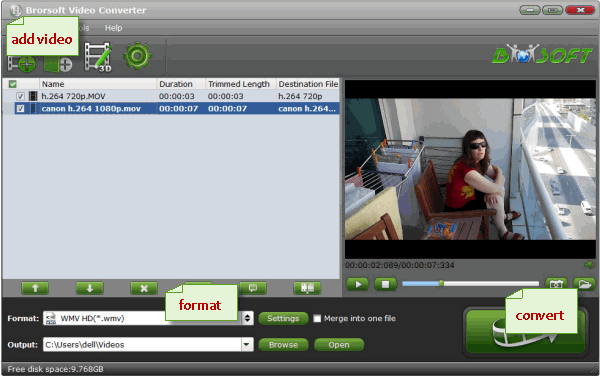
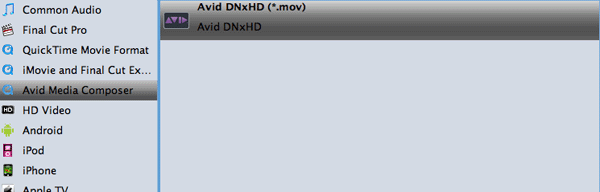
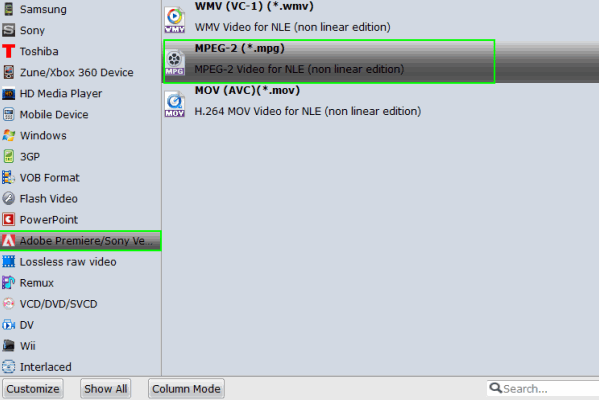
Step 2: Choose Output Format. Click Format bar and choose "HD Video" > "WMV HD(*.wmv)" as the output video format. AVI is also the choice.


Tip: If you like, adjust video and audio parameters, including the Bitrate of Video and Audio, the Codec of Video and Audio, Video Size, Sample Rate, Frame Rate, Audio Channels, etc., by clicking the Settings button on the main interface for getting the best quality.


Step 3: When everything is ready, click the Convert button and all the imported MOV video files will be converted to WMV format by this MOV to Windows Movie Maker Video Converter.

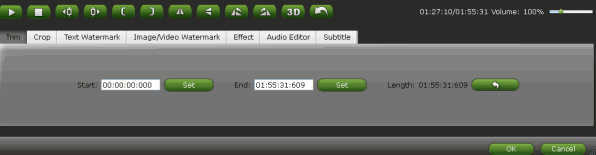
Tips: To edit MOV video before converting, click the Edit button in the primary window. Brorsoft Video Converter Ultimate includes all regular video editing tools like Rotate, Trim, Crop, Effect, Watermark and Subtitle.

Step 4. Depending on your version of Windows Movie Maker or Windows Live Movie Maker, the buttons are slightly different:

Import L840 MOV video to Windows Movie Maker: When the conversion complete, open Windows Movie Maker and click "Import" or "Import Video" on the left to import your video to the movie collection and drag and drop to the timeline for editing.

Import L840 MOV video to Windows Live Movie Maker: Start Windows Live Movie Maker and go to "Home" tab in the ribbon menu and click "Add video" in the "Add" panel to locate the converted MP4 video.

More Topics:
MOV to iMovie
H.264 to After Effects
MOV to Final Cut Pro
MOV to Sony Vegas Pro
H.264 to Sony Movie Studio
H.264 to Adobe Premiere Pro
Edit Nikon COOLPIX L840 H.264 MOV in Premiere Pro CC/CS6
Transcode Nikon COOLPIX L840 MOV into Sony Vegas Pro 12/13
Transcoding Nikon COOLPIX L840 MOV for Final Cut Pro X, FCP 7
Convert Nikon COOLPIX L840 MOV to Avid DNxHD for Media Composer
How to Convert Canon EOS 70D H.264 MOV to DNxHD MOV for Davinci Resolve 11

Thursday, December 24, 2015

Webm to Avid MC - How do i import Webm to Avid Media Composer (El Capitan)

Webm to Avid Media Composer delivers a simple yet effective solution to convert Webm to Avid Media Composer importable DNxHD codec.

WebM is a video file format developed by Google, distributed under a BSD license. It is primarily intended to offer a royalty-free alternative to use in the HTML5 video tag. VLC media player, MPlayer and K-Multimedia Player have native support for playing WebM files and YouTube offers WebM videos as part of its HTML5 player. All uploaded files are encoded into WebM.

In fact, although as popular as it being, the WebM format is only for HTML 5 websites to stream videos online and few portable devices and players currently support playing this kind of files. That's why many people often encounter kinds of problems when trying to play WebM videos on QuickTime or iTunes, edit WebM flies in NLE systems.

Quesiton: Webm in Avid ?
"I am running Avid MC6.0.1 on Mac OS X 10.7.4 and I'm trying to convert a webm file to quicktime format to us in media composer. Any suggestion ?"


On Avid official website, it recommends DNxHD or XDCAM codec for editing, and DNxHD codec is the first choice. So if want to get Avid Media Composer work perfectly with Webm videos, the easy workaround is to convert Webm to DNxHD mov. Brorosft Video Converter for Mac can be of great help in this task. With it, you can effortlessly transcode Webm files to DNxHD encoded MOV for Media Composer 5/5.5/6/7, and it works well and converts flawlessly. Meanwhile, the Mac Video Conversion tool can create files compatible with various non-linear editing systems like FCP, FCE, iMovie, and Adobe Premiere (Pro), etc. If you are running on Windows, get Brorsoft Video Converter. Now just, download the program and achieve your goal smoothly.

Download the Webm to Avid Converter:

(Note: Click here for OS X 10.5)

How to convert Webm format to Avid supported DNxHD MOV

Step 1. Click Add button to load the Webm movies you want to convert for iMovie. Or simply drag your videos to the left item bar for converting. Batch conversion is supported so you can add many files at a time to save the conversion time. And as you see, added files can be previewed in the right Preview window and you can take snapshots of your favorite video scenes.


Step 2. Choose output format

Click Format on the main interface and choose Avid Media Composer > Avid DNxHD(*.mov) as output format. It ensures the best quality while working with the output files in Avid. You are also allowed to adjust video size, bit rate, frame rate, sample rate and audio channels by clicking "Settings" icon.


Step 3. Start the Webm to DNxHD conversion

After all the settings, now you've come to the last step: click the Convert button to start converting your videos. The conversion time depends on your computer speed, file length, etc. Generally, it won't take much a long time. When the conversion completes, get the converted Avid compatible videos in the output folder and import them to Avid Media Composer(5/5.5/6/6.5/7) without any troubles.

More Guides:

How to Import MPG files to iMovie
How to Convert MPG to QuickTime MOV
Embed FLV files into PowerPoint for Playing
How to Convert MP4 to MOV/AVI/FLV/M4V...
How to Convert and Import MPG to Final Cut Pro
How to Convert and Import MP4 files to Final Cut Pro
How to convert ISO to iPad Mini 4/3/2 friendly formats
Guide: Transcode 4K MXF/MOV/MP4 to 1080p ProRes
How to Convert and Import MP4 into Adobe Premiere Pro
How to rip Blu-ray to H.264 MP4/MKV/M4V/MOV with ease
How to import iPad Video into Final Cut Pro for further editing

Sunday, December 13, 2015

Guide on inserting a FLV file into PowerPoint easily

Summary: This article aims to teach you how to easily embed all kinds of FLV files into PowerPoint for Presentations.

An FLV file is the native, proprietary document file format created by the Adobe Flash authoring program. Now more and more people download their favorite flash videos from YouTube and other video sharing websites and want to insert them into PowerPoint to make a good presentation. But the FLV video format is not supported by PowerPoint, even the latest PowerPoint 2016. How can we insert FLV video into PowerPoint? Here I will show you how to insert your favoriate FLV Video to PowerPoint according to my experience. Hope it can help you.

As we all know, the best format that all PowerPoint versions can support are AVI and WMV, which are created by Microsoft itself. Chances are you have a bunch of FLV flash videos at hand and want to insert them to PPT for playing. The recommended suggestion is to convert FLV to AVI or WMV at initially and then you can import the converted videos to PPT smoothly. In view of converting speed and quality, here I strongly recommend you try the Brorsoft Video Converter.

With running it, you can easily and quickly encode FLV videos to PowerPoint friendly AVI, WMV while keeping the excellent output quality. Plus, with it you can also convert FLV video to any other popular video formats, such as MOV, MPEG, DivX, XviD, 3GP, VOB, etc. Besides, the built-in video editor lets you personalize your video. If you insert FLV video into PPT on Mac(El Capitan), turn to Brorsoft Video Converter for Mac. Now, please download the most suitable program according to your need and follow the corresponding tutorial.

Guide to Convert FLV to PowerPoint supported video formats

Step 1: First, launch the FLV to PPT converter. Click the Add Files button on the main interface to import FLV videos that you want to insert into PowerPoint. The program supports batch conversion, so you can add a pile of videos to enjoy the fast conversion speed.


Step 2: Now you should go to the Output Format drop-down list, choose WMV or AVI as the output format on the Format > Common Video list.


Tips: If you want to get rid of some part of the video, you can click the Edit button. When enter the edit > Trim interface, you should either drag the slider bar back and forth or set the start time and the end time for the video to get the part you want.


Step 3: After everything is ready, you should press the big, shiny "Convert" button to begin the YouTube video conversion.

Once the video is saved as an AVI or WMV file, switch to PowerPoint and choose Insert - > Movie - > "Movie from file" to put the YouTube video into the current slide.

More Topics:
FLV to iTunes
FLV to PowerPoint
FLV to Final Cut Pro
How to Easily Convert Blu-ray to H.264 MP4
2 solution to view Video_TS files on Windows PC
How to make TiVo editable in Adobe Premiere Elements
Convert DVD ISO to Plex Media Server compatible format
How to convert ISO to Gear VR friendly content for playback
How to Convert DVD ISO for Editing in Final Cut Pro X/7/6
How to convert iPhone 6S 4K video to DNxHD for Avid MC
Convert DVD VIDEO_TS folder to play on Android devices
Easy Solution to Convert ISO to Roku 4/3/2 with the best quality

Sunday, December 6, 2015

iPhone 6S 4K to Avid MC - Load and Transfer iPhone 4K to 1080p editing in Avid Media Composer

If you need to import iPhone 6S 4K videos to Avid Media Composer (MC 8/7/6/5) for editing, this is the right guide for you. Keep on to learn more details.

The iPhone 6s supports a new 4K video format that lets you record videos in a higher resolution than the 1080P HD you are used to recording on your iPhone. Using the iPhone 6s 4K video option will fill up your iPhone fast, with roughly 375MB per minute you record. If you own the 16GB iPhone 6s you may not want to use this option.

Read here which is how you can turn on 4K recording on your iPhone 6s. If you do not take these steps you will only record in 1080P 30 frames per second.

I like to edit iPhone video using Avid Media Composer, but there's actually no way to edit a 4K project natively with Avid. If you need to upload to YouTube, Vimeo or other services, you will need to verify that you can upload at 4K resolution. Some apps and services only support 1080P uploads.

So, change iPhone 6S 4K to 1080p becomes a must. How to make it true? Any ideas ?


The best and easiest way to import iPhone 6S 4k video files into Avid Media Composer for editing is to convert iPhone 4K or 1080p H.264 MOV to DNxHD .mov with Brorsoft 4K Video Converter for Mac.

It's an optimal iPhone converter that helps you decode 4k or 1080p H.264 MOV files when converting into a different, and ideally more edit friendly format like DNxHD .mov for Media Composer. So you can edit iPhone footage with Avid MC without any issue. Beside, this video convert program can also help to convert iPhone videos to Adobe Premiere Pro, Final Cut Pro, iMovie, FCE, etc. Plus, with the built-in video editing feature of the program, you can trim, crop, add watermark and more to your video files. If you want to transcode iPhone videos to Avid MC on Windows, please turn to Video Converter. Now download the software and follow the steps to re-encode iPhone 6S 4K to Avid DNxHD.

Download iPhone Video to Avid Media Composer Converter:

(Note: Click here for OS X 10.5)

How to convert iPhone 6S 4K video to DNxHD for Avid MC

Step 1. Add iPhone videos

Install and run the iPhone Video to Avid Converter on your Mac, then click "Add" button to browse and load your recorded iPhone videos which you've transferred to your Mac.


Note: You can check the "Merge into one" box to merge several video files together for easier editing.

Step 2: Choose Avid compatible format

You just need to go to "Avid Media Composer -> DNxHD (*.mov)" as the best video format for editing MOV footage in Avid keeping good video quality.


Tip: Tap "settings" to customize the output parameters- adjust the video size, bitrate, frame rate, audio sample rate, audio channel, etc to get a decent video for editing in Avid MC.

Step 3. Start to convert iPhone Video to Avid DNxHD

As soon as all the above settings are completed, you can press "Convert" button to start conversion.

After conversion is done, simply click "Open" button to find generated DNxHD encoded MOV videos. Afterwards, you can transfer the converted iPhone clips into Avid Media Composer 5/5.5/6/6.5/7/8 for editing smoothly on Mac with ease.

More Topics:

Convert TiVo to AVI
Convert WMV to FCP
Convert MKV to MOV
Converting 4K video to work in Apple TV
Put iPhone Videos to Sony Vegas Pro 10/11/12/13
How to convert iPhone video to DNxHD for Avid MC
How to convert .dvdmedia to MOV/MP4 on Mac easily
Edit iPhone MOV/MP4 files in Davinci Resolve 11/10/9
Convert iPhone MOV/MP4 files to Pinnacle Studio 14/15/16
Easily import iPhone videos (MP4/MOV) to Sony Movie Studio

Wednesday, December 2, 2015

Best&Professional Video_TS to Apple TV 4/3/2 Converter for Watching Video_TS on the New Apple TV

Want to import DVD Video_TS movies to the New Apple TV? Follow this step by step guide to convert VIDEO_TS to Apple TV 4/3/2 for playback or transferring to your iPod, iPhone, iPad.

The new Apple TV receives some much needed hardware improvements. What's funny is that none of them are really required for video playback, as the old A5 chip had the ability to decode 1080p H.264 video in hardware. What the upgrades are required for is running the brand new tvOS, and all the apps and games that Apple hopes will be made for it. I'm surprised that Apple hasn't built in support for HDMI 2.0 or HEVC decoding in order to support existing 4K TV sets and future 4K content encoded with HEVC.

And, on the other hand, many people have a lot of DVDs (technically, the specification is called DVD-Video). You probably know the VIDEO_TS and AUDIO_TS folders with the VOB files. The problem is: This format is not compatible with your Apple TV and can’t be streamed directly via AirPlay. So, if you get used to the New Apple TV feature and want to import your Video_TS files to Apple TV 4/3/2, there is also a smart solution: converting your Video_ts files to Apple TV 4/3/2 compatible videos with easy operation and high output quality.


Here Brorsoft DVD Ripper for Mac is highly recommended to you. With it, you can effortlessly get your work done in just a few clicks. Besides converting DVD Video_TS files, the program can also help you handle DVD discs, ISO/IFO files. If you are using a PC, please turn to the Windows version. Download the right program and start enjoying your Video_TS files with full HD quality on Apple TV!


How to convert and play Video_TS folder on Apple TV 4/3/2

Step 1. Load VIDEO_TS files

Run the Video_TS to Apple TV Converter program and click "Load DVD" to select and load the Video_TS folder to the program. There are many titles in one Video_TS folder, usually you just need to choose the main title to rip.


Step 2. Choose the output format

Click "Format" bar and turn to the Apple TV category. The program has a number of presets for Apple TV, Apple TV 2, and Apple TV 3rd Generation. Here "Apple TV 3 1080p Dolby Digital Pass-through (*.m4v)" preset is recommended.


Note: By choosing this format, you will get two sound tracks in the result M4V video, one is stereo, and the other is AC3 encoded Dolby Digital 5.1 pass-through. When your Apple TV is connected to audio receiver, the 5.1 surround sound will work. When ATV is connected to your HDTV only, the stereo track will work.

Step 3. Start converting Video_TS to Apple TV 4/3/2

After all settings, tap "Convert" button to start DVD Video_TS movies to M4V for Apple TV conversion immediately.

Once conversion completes, you can get the output files via "Open" panel for your Apple TV effortlessly. Now you can enjoy your DVD Video_TS movies on Apple TV without any issue.

More Topics:

Convert Video_TS to MP4
Convert Video_TS to AVI
Convert Video_TS to MOV
Convert Video_TS to iMovie
Play Video_TS on Windows
Watch and Play H.265 Videos via Apple TV 4
Convert Sony 3D MTS to SBS MP4 with ease
How to convert H.265 video to iTunes on Windows
Two Ways to Play Video_TS files on Windows PC
Play Video_TS on Windows (Windows 10/8/7 Included)
Convert DVD VIDEO_TS folder to play on Android devices

Monday, November 23, 2015

WTV clips to MP4 format - Easiest Way to Convert WTV to MP4 (Windows/Mac)

If you have some clips in WTV format and want to play on your portable media devices, you will need to convert WTV to MP4 or some other playable or editable formats.

Source From: How to convert WTV format to MP4

WTV files make enjoy TV shows more conveniently, but this format is only compatible with a few media players. Thus, many people including you want to convert WTV to MP4 format so the WTV file playback is easier.

However, there are many WTV Converters, many of them can only convert WTV to DVR-MS or can only convert DVR-MS instead of WTV to other video formats. Worse more, few of the WTV conversion apps arecompatible with Windows 10.


That's where Brorsoft WTV Video Converter comes in, which has the ability to transcode WTV files to MP4 format with fast converting speed while ramainning the excellent visual quality in Windows 10/8/7.

Besides WTV files, it can also help you encode/re-encode almost all 1080p/720p HD videos including AVI, MKV, VOB, MPG, MOV, TiVo, MTS etc. for playback on PC, Android based tablet/phone Galaxy S4, Nexus 7/10, Galaxy Tab 2/3, Kindle Fire HD, Nook HD; Windows 8 based tablet/phone Nokia Lumia 520/720/920, Microsoft Surface RT/Pro, or iOS devices Apple TV, iPad, iPhone, etc to meet your different needs. What's more, this ideal WTV Converter is also equipped with video editing function like compress WTV video file size, trim WTV, merge several WTV files into one, crop WTV, rotate WTV video, add subtitle, watermark, effects to WTV video, remove subtitle from WTV recording file, increase WTV video volume and etc. If you are a Mac user, turn to the Brorsfot WTV Video Converter for Mac. Download it and follow the steps below to convert WTV video to MP4. Just download the intuitive video converting tool and follow the steps below to convert Windows Media Center recorded WTV file to MP4 with ease.

How to convert WTV format to MP4

Step 1: Add files

Launch the WTV File Converter, then head to the folder where the windows media center recording are stored, by default, the destination is user/public/recorded TV. Add the files to the program.


Step 2: Select output format

Click Format bar and select MP4 as the output format from Common Video list. If you prefer high definition video, you can choose "H.264 HD Video(*.mp4)" from the "HD Video" list.


Tip: You can adjust video/audio parameters such as bitrate, sample rate, frame rate, codec, channels, etc after clicking on "Settings" icon.

Step 3: Edit your WTV videos(optional)

The recorded TV shows and movies tend to have commercials, you can use the video converter's Trim feature to get rid of these.


Step 4: Start converting WTV

Press "Convert" button to start the WTV conversion. It will be finished with high output quality and fast converting speed.

After the conversion, locate the converted file in the folder you specified and go ahead to play and share your videos with other applications or transfer them to your portable devices for enjoyment on the go.

More Topics:

Convert TiVo to MPEG
Convert H.264 to H.265
Convert 2D to 3D Video
Convert MP4 to iMovie AIC
Convert VOB to MP4/MOV
Convert MKV to Apple TV Supported Format
How to Convert and Play MP4 on DVD Player
The best workflow of converting .dvdmedia on Mac
Convert MXF to Corel VideoStudio for smooth editing
Convert Video_TS for Editing in Avid Media Composer
How to Play Blu-ray and DVD on Mac OS X (El Capitan)

Thursday, November 19, 2015

Rip and Convert 3D Blu-ray to SBS 3D MKV with ease

Summary: This article focuses on tips of ripping, converting 3D Blu-ray to SBS 3D MKV for easily playing with any popular 3D devices.

A few weeks ago, I googled for a 3D Blu-ray disc software ripper which can help me rip 3D Blu-ray to 3D MKV files in SBS or Anaglyph 3D. Google turns up several results, and here I will share the full guide on ripping 3D Blu-ray to SBS 3D MKV with the help of the best 3D Blu-ray ripping software I’ve ever found.

Well, as the popularity of 3D Blu-ray movies, more and more problems about how to rip 3D Blu-ray movies arose. To convert 3D Blu-ray movie to SBS 3D MKV for greater compatibility on 3D TV, Gear VR, glasses-free 3D smartphones or any other 3D display devices, a reliable 3D Blu-ray ripper is necessary. And among a pile of Blu-ray ripping tools on the market(refer to Top 5 Best Blu-ray Ripping Program Review), Brorsoft 3D Blu-ray Ripper is the best one I’d tested.

It is professional Blu-ray 3D converter software that can get rid of all Blu-ray protections and freely convert 3D Blu-rays to Side-by-Side, Top-Bottom, Anaglyph 3D videos in a bevy of formats MKV, MP4, MOV, WMV, AVI for playback on 3D TV, and other 3D display devices. And with its outstanding speed, quality and robust functions, you must be happy. Mac users could use Blu-ray Ripping software for Mac which is specially designed for Mac users to create 3D SBS MKV/MP4/MOV video out of 3D/2D Blu-ray movies. Now download the program and let's learn how to do it.

Full Guide: Convert 3D Blu-ray to SBS 3D MKV Video

1. Load 3D Blu-ray movie

Insert your 3D Blu-ray disc into your BD drive, run the 3D Blu-ray ripping software and click "BD/DVD disc" icon to load your movies.


2. Choose output format

Navigate the Format bar and follow the path "3D Video > MKV Side-by-Side 3D Video (*.mkv)" for ripping Blu-ray to side-by-side 3D MKV video. By the way, this 3D Blu-ray ripper provides more 3D outputs like MP4 Top-bottom 3D Video (*.mp4)" or "MOV Top-Bottom 3D Video (*.mov)" to you.


Tip: If you like, you can click "Settings" to change your target video size, bitrate, frame rate and 3D depth. To get best video quality, you'd better switch them to "original".

3. Start 3D Blu-ray ripping

Finally click the Convert button to begin converting 3D Blu-ray to MKV SBS 3D video with the best 3D Blu-ray to SBS 3D MKV converter instantly.

Related Guides:

Rip Blu-ray to iTunes
Handbrake Rip Blu-ray
Copy Full Blu-ray Disc
Convert Blu-ray to MKV
Rip Blu-ray with forced subs
How to Rip 3D Blu-ray for Playback on Gear VR
Converting/uploading GoPro Hero4 4K to YouTube
How to Rip 3D Blu-ray to SBS 3D MP4 videos Easily
How to convert ISO to NAS supported video formats
Transcode MTS to MOV on Mac El Capitan no quality loss
Converting MXF to ProRes .MOV on Mac OS X El Capitan

Monday, November 2, 2015

An Easiest Way to Import MVI files to Windows Movie Maker Editing

Have problems importing MVI video to Windows Movie Maker for editing? This tutorial will show you what's the simple solution to fix the problem. After converting MVI to Movie Maker supported format, you can freely play or edit MVI files in WMV format at will. 

""I have a Canon camera that produces MVI._ files which are not recognized by the Windoes Movie Maker program. I need to be able to convert the MVI to WMV files so that the movie clips I take can be used seamlessly in the Windows Movie Maker program." 

Best Answer: 

What you need is a just a common video converter like Brorsoft Video Converter. It's the optimal MVI converter for you, which can help you decode the MVI files when converting into a different, and ideally more edit friendly, compression format like AVI, WMV, FLV, MOV, MP4, MPEG, MKV, etc. So, you can edit MVI footage with Windows Movie Maker, Pinnacle Studio, Adobe Premier Pro, Sony Vegas smoothly as well as some other purpose like for email. Besides MVI, this video convert program can also help to convert between any popular video and audio formats as you need. Plus, with the built-in video editing feature of the program, you can trim, crop, add watermark and more to your video files. If you are running on Mac, please turn to its equivalent Mac version MVI Video Converter Mac. Download it and follow the tutorial below showing the detailed steps on how to convert MVI. 

Download the MVI Converter: 

  (Note: Click here for OS X 10.5) 
How to Convert MVI into WMV for Windows Movie Maker 

Step 1: Run MVI file converter on PC and import MVI clips to the program via "Add" button. If necessary, check the “Merge into one” box to combine MVI files together. 


Step 2: This video converter offers optimized format preset for Windows Movie Maker. Just click "Format" menu to select WMV HD(*.wmv) format in "HD Video" column. 


Tip: You can click “Settings” icon to and enter "Profile Settings" panel to adjust video size, bit rate, frame rate, sample rate and audio channels before conversion. 

Step 3: Tap “Convert” button to start encoding MVI to Windows Movie Maker. 

When the conversion is finished, click "Open" button to get the exported WMV files for transferring to Windows Movie Maker with easy playback or editing. 

Additional Tips: This powerful Video Converter not only can help you deal with MVI to WMM, but also offers many technical output formats for NLEs like Avid Media Composer, Adobe Premiere Pro, Pinnacle Studio, Sony Vegas Pro, etc. 

More Topics: 
Split or Merge Video files 
Import AVI to Premiere Pro 
Import MKV/AVI/WMV to FCP 
Convert Bandicam videos for using in iMovie 
Convert MVI files for using in Windows Movie Maker 
Convert and Import Bandicam video clips to iMovie on Mac 
How to Transcode MXF to MP4, AVI, MOV, WMV, MPEG... 
How to Convert MTS to AVI, MOV, WMV, M4V, MPEG, FLV

Tuesday, October 20, 2015

Tutorial: How to convert Sony FDR-X1000 4K XAVC S for editing in FCP 7/X

Can't import and edit Sony FDR X1000 4K XAVC S video in Final Cut Pro? Don't worry about this. After reading the following pages, you will edit FDR X1000 video in FCP X, FCP 7 and FCP 6 easily and without rendering.

The Sony FDR-X1000 is small, lightweight and slash proof, but shipping with a case that is fully waterproofed. The wide angle Zeiss lens provides up to 170° FOV (field of view), shooting onto microSDs and powered by a removable battery. It records in 4K up to 30, 1080p up to 120fps and 720p up to 420fps. About the same as the GoPro Hero 4, right? The sting in the tail is the implementation of Sonys XAVC S codec, far more robust than GoPro’s H.264 options.

If you recorded some videos by Sony FDR X1000, you may like editing the 4K or 1080P HD video on Mac. Of course, Final Cut Pro is your best choice. With this professional Mac editing software, you can do anything as you want. But, we can't import the XAVC S MP4 videos from Sony FDR X1000 to FCP directly.

As we all know, Final Cut Pro works best with clips in the ProRes MOV format, the easy workaround is, get a Mac ProRes Converter for FCP and convert Sony FDR-X1000 XAVC S to Apple ProRes, which will save you both time and trouble, and all you need is to drag the result videos for prompt editing.


To make the task more convenient to achieve, a professional Converter-Brorsoft Video Converter for Mac is highly recommended to you. With it, you can effortlessly transcode Sony FDR-X1000 XAVC S files to Apple ProRes - ensuring maximum editing quality and efficiency when working with Final Cut Pro (no matter Final Cut Pro X, FCP 6 or FCP 7). The conversion is darn easy to be finished with only three clicks without loss of video quality. Click the Download button below to get the program and check out the easy steps to convert and import Sony FDR-X1000 XAVC S videos to Final Cut Pro without any troubles.

Download Sony FDR-X1000 XAVC S Video Converter on Mac

(Note: Click here for OS X 10.5)

How to Convert Sony FDR-X1000 XAVC S footage for Editing in FCP

Step 1: Install and launch the mac Video Converter and load the recordings to it. If you want to merge several clips, just need to check the "Merge into one" box.


Step 2: Tap the Format bar and select Final Cut Pro > Apple ProRes 422 (*.mov), which is the best format for FCP.


Tips: (Optional) Choose "Settings" to set video resolution

(1920 x 1080/1440 x 1080/1280 x 720/720 x 480), bitrate(from 1Mbps to 20Mbps), frame rate (24p/30p) as you like. To deinterlace, crop, trim Sony FDR-AX1 XAVC S videos, click "Edit" menu.

Step 3: Press "Convert" button to start transcoding Sony FDR-X1000 XAVC S to ProRes 422 for Final Cut Pro.

When the conversion process shows in 100%, you can easily and effortlessly locate the converted ProRes .mov files by clicking the "Open" button in the main interface. Then, you can bring and edit Sony FDR-X1000 XAVC S footage in Final Cut Pro without any issue.

Additional Tips:

If you also wanna convert Sony FDR-X1000 XAVC S video files on Edius, Sony Vegas Pro, Adobe Premiere Pro , iMovie, FCP... you can apply this professional all-in-one tool Brorsoft iMedia Converter for Mac or Brorsoft Video Converter Ultimate for Windows.

If you have problems when importing or editing your Canon, Sony, Panasonic etc, camera video files, you can check out “Brorsoft Camcorder/Camera Importing Tips" or "FCE, FCP, iMovie Column"to get your solutions.

Related Guides:

4K workflow with FCP
4K workflow with Premiere
4K Ultra HD Video Converter
4K workflow with Sony Vegas
How to Edit Sony F55/F5 XAVC in Premiere Pro
How to Import Sony XAVC file to Pinnacle Studio
Editing Canon XF100 MXF files in Final Cut Pro X
Importing Sony A7S AVCHD fles to Avid MC 8.5.3
Working Sony PMW-500 MXF files in Final Cut Pro X
How to load Sony XAVC file to Windows Movie Maker
Impoting Canon C500 MXF to Premiere Elements 15/14/13
Convert Panasonic HC-PV100 AVCHD files to Pinnacle Studio 
Best Workflow for Editing Sony A7S AVCHD files in Sony Movie Studio

Friday, October 2, 2015

Work Panasonic Lumix TZ70/ZS50 AVCHD with Sony Movie Studio 10/11/12/13

Sincerely hope this paper can do you a favor about how to import Panasonic Lumix TZ70/ZS50 AVCHD files to Sony Movie Studio for editing. Read on.

Unveiled at CES 2015, Panasonic Lumix TZ70 of ZS50 is a super zoom camera which you can fit into your coat pocket. The shooting mode is of course AVCHD, which is a file-based format for the digital recording and playback of high-definition video. For many NLEs like Sony Movie Studio, this AVCHD may not such friendly one. So is there any solution to import TZ70/ZS50 AVCHD to Sony Movie Stuido 10/11/12/13for editing?


Based on our experience, the best method to work Panasonic Lumix TZ70 MTS videos in Sony Movie Studio is to transcode MTS footage into Movie Studio most compatible format like MPEG-2. To finish the task, you can get help from Brorsoft MTS/M2TS Converter. It is a highly-recommended video converting tool for you to convert MTS files to Sony Movie Studio compatible format without loosing quality. It features optimal formats for Adobe Premiere Pro, Sony Vegas Pro, Windows Movie Maker, Avid Media Composer and more editing apps, resulting files with great image and sound quality without audio delay issues. Download the program and you can edit MTS in Sony Movie Studio 10/11/12/13 smoothly as you wish.

Read More: Fix AVI and Sony Movie Studio Issues | Solve Sony Movie Studio .MOV Problems

Download AVCHD MTS Converter:


Convert Panasonic Lumix TZ70 MTS to MPEG-2 for Sony Movie Studio editing

Step 1. Import MTS to the converter

Run the MTS to Sony Movie Studio converter and click the Add Files button to import the MTS videos to be converted. The converter supports converting multiple files at a time.


Step 2. Choose target format

Click "Format" bar and choose "Adobe Premiere/Sony Vegas > MPEG-2 (*.mpg)" as output format on the drop-down menu.


Tip: In case the default settings do not fit your requirement, you can click "Settings" button and enter "Profile Settings" panel to adjust video size, bit rate, frame rate, sample rate and audio channels.

Step 3. Start MTS conversion with a click

Simply click the "Convert" button to start converting MTS for Sony Movie Studio and everything else will be automated.

When the conversion is finished, you can click "Open" button to get the generated MPG files effortlessly. Now, it's much easy for you to import Panasonic TZ70 MTS files to Sony Movie Studio 10/11/12/13 for further editing.

More Topics:
Import MTS clips to FCP
Convert MTS to Andorid
Convert 3D AVCHD MTS
Trancode MTS for Premiere
Transcode MTS to Pinnacle
How to rip DVD movies to Adobe Premiere Pro with ease
Steps: Convert MPG to Plex Media Server compatible format
ranscode DJI Phantom 3 4K MOV for Editing in Windows Movie Maker

Sunday, September 20, 2015

Loading/Converting Video_TS files to iMovie supported format Editing (El Capitan)

With this awesome guide, you can get the best Video_TS Workflow for iMovie, which guides you through how to import and edit DVD Video_TS video files in iMovie 08/09/11 smoothly on Mac OS X ( El Capitan included).

Video_TS files are used to store the disc files, including video objects files, disc information files, etc. It's not that difficult to play these Video_TS files. But if you want to import Video_TS to iMovie, iMovie always refuse to import Video_TS files, let alone to open Video_TS in iMovie forediting.

The reason why iMovie cannot import Video_TS files is that Video_TS is not a supported video format for iMovie. iMovie is designed to work with the following video formats: MPEG 4 Simple Profile, DV, DVWidescreen, HDV 1080i (25 and 30 fps), HDV 720p (25 and 30 fps), iSight. In order to successful import and open Video_TS in iMovie, it is better to convert Video_TS files to one of the above iMovie supported format.


To convert Video_TS folder to AIC MOV for iMovie, you need to get a DVD file converter. Here Brorsoft DVD Ripper for Mac is highly recommended. Overall, this DVD ripping program enables you to rip and convert DVD disc, DVD ISO/IFO files, DVD VIDEO_TS folder, to all popular video formats .mov, .wmv, .avi, .mp4, .mpg, etc and even extract audio from DVD movies. With it, you can convert Video_TS folder to iMovie on Mac OS X(Yosemite, El Capitan included) quickly with high video quality. Besides, the built-in video editor allows you to trim, crop, add watermarks, etc. to get the very part and effect you want.

If you're on Windows, please turn to DVD Ripper, which allows you to convert Video_TS files to MOV on Windows(including Windows8/Windows 10). Now download the right version according to your situation and check out the steps below.

Download the VIDEO_TS converter:

(Note: Click here for OS X 10.5) How to Convert Video_TS for Editing in iMovie smoothly

Step 1: Load VIDEO_TS files to the converter

Run the VIDEO_TS to iMovie Converterand click "Load DVD" to import the VIDEO_TS files you want to convert. DVD disc, ISO image files are supported as well.


Step 2: Select iMovie friendly format

Click the "Format" to select output format. Choose "iMovie and Final Cut Express > Apple Intermediate Codec(AIC)(*.mov)" as the output format.


Tip: Before conversion, you can click the "Settings" icon to customize the video/audio settings including the Bitrate of Video and Audio, Audio, Video Size, Sample Rate, Frame Rate, Audio Channels, etc for iMovie.


Step 3: Converting Video_TS video files to iMovie

After all the necessary setting have been done, click "Convert" button to start transcoding Video_TS to AIC .mov.

Finally, launch iMovie. In iMovie, go to the File menu, choose Import > Movies, and then navigate to the folder that your output Video_TS files are saved. Select the files and click "Import".

You're done. By converting Video_TS to iMovie compatible format, you can easily enhance your video and make high quality movies with iMovie.

Read More:

How to import DVD to Final Cut Pro X
How to convert DVD for editing in Adobe Premiere
How to load DVD clips into Avid Media Composer
Convert DVD to iPhone 6S Plus friendly MP4 video
Import Video_TS files to iMovie For Editing with OS X
Best Methods to Recover data from water damaged iPhone
Best way to convert DVD to iPhone 6S friendly MP4 video
How to Convert SWF to iMovie supported AIC MOV files
How to Convert JVC 4K video to Final Cut Pro X/7 on Mac

Friday, September 18, 2015

Make Sony HXR-NX100 XAVC S, AVCHD accepted by Avid Media Composer 5/6/7

This page tells you to import and edit Sony HXR-NX100 XAVC S video in Avid Media Composer without any problem. Learn details.

The HXR-NX100 is ergonomically designed to give a lightweight and easy-to-use form factor that ensures quality, reliability and peace of mind during any type of shoot. Further extending the recording flexibility of the Sony NXCAM range, the HXR-NX100 is able to record in AVCHD, DV and XAVC S 50Mbps for multiple choices and high quality images. Operational flexibility is maximised by recording onto affordable and readily available consumer memory cards. The HXR-NX100 features dual media slots, which enables recording onto two memory cards either simultaneously or via a relay mode, where recording automatically switches when the first card is full.

I think Avid Media Composer could import my Sony HXR-NX100 XAVC S/AVCHD files without any trouble, but things do not go well. While dealing with XAVC S/AVCHD files from my NX100, I met a lot of problems. Although Sony have created a special AMA plug-in for AVID (PDZK-MA2), providing support for XAVC files in Avid Media Composer, it can't work sometimes. Via Google searching, you can find lots of issues about XAVC S codec in Avid MC.


To get rid of the issues, you will need to transcode Sony NX100 XAVC S to a more “edit” friendly codec for Avid Media Composer, DNxHD is the best recommend. So I share the guide here with you how to convert Sony HXR-NX100 XAVC S to Avid friendly format using Brorsoft Video Converter for Mac .

It can be used as a professional XAVC S Converter under OS X Leopard (10.5), Snow Leopard (10.6), Lion (10.7), Mountain Lion (10.8), Mavericks(10.9), Yosemite(10.10), El Capitan(10.11). With it, you can effortlessly transcode XAVC to MPEG-2 for Adobe Premiere, DNxHD for Avid Media Composer without losing quality. For Windows users, please get Video Converter. Below is how.

Convert and Import Sony HXR-NX100 XAVC S to Avid Media Composer 5/6/7/8

Step 1: After launching the XAVC S Converter on Mac, load your XAVC S footage to it from your camcorder. If necessary, you can click the button “Merge into one” to join several XAVC S videos to one file.


Step 2: Click Format bar and choose output format.
To convert Sony HXR-NX100 XAVC S to Avid Media Composer, choose Avid Media Composer -> Avid DNxHD (*.mov) as the target format.


Step 3: Click Convert button to start to convert Sony HXR-NX100 XAVC S Mac conversion.

Once the conversion completes, simply click “Open” button to get the converted videos. And now you can bring the Sony HXR-NX100 XAVC S footage into Avid Media Composer 4/5/6/7 for smooth editing.

More Topics:

XAVC S to Avid
XAVC S to iMovie
XAVC S to Final Cut Pro
Transcode Sony HDR-PJ440 XAVC S to Avid MC
How to Use XAVC S Clips in Windows Movie Maker
How to convert DJI Phantom 3 Ultra HD 4K to 1080p
How to Fix XAVC S and FCP 7/X Incompatiblity Issues
How to Import XAVC/XAVC S Files to iMovie'11/09/08
Edit XAVC S files from Sony HXR-NX100 in Premiere Pro