[Big News]Brorsoft's iPhone Data Recovery Entitled iRefone Released - 50% Discount Off

[Big News]Brorsoft's iPhone Data Recovery Entitled iRefone Released - 50% Discount Off
Get Brorsoft iRefone for Windows and Mac by joning Brorsoft Facebook Community activities. Click Like button, you can get 50% Off Promo Codes.

Friday, December 23, 2016

Loading H.265 files to Final Cut Pro for editing

Editing H.265 Videos in Final Cut Pro X/7
In our daily life, we can access lots of different video files and H.265 is a new codec for us. When trying to work some H.265 files in Final Cut Pro, we always meet issues. Luckily, we've worked a quick solution to solve the issue. Now read on to get the best workflow for importing H.265 to Final Cut Pro for further editing.

Obviously, Apple has no plan to add support for H.265 codec. To edit H.265 videos with Final Cut Pro X/7/6, you'll need to convert H.265 to a more editing-friendly format, such a Final Cut Pro's ProRes. Brorsoft Video Converter for Mac, an easy-to-use yet professional H.265 encoder and decoder is highly recommended to help you complete the task.

This program features high efficiency and seamless conversion. With it, you can effortlessly convert H.265 video to ProRes encoded MOV files - ensuring maximum editing quality and efficiency when working with FCP X, FCP 7 and FCP 6. In additon, the program can also help you transcode H.265 files to Apple Intermediate Codec, DNxHD, MPEG-2, AVI, WMV, FLV, etc. for smoothly editing or playback with iMovie, Avid, Adobe Premiere, etc. Below is the detailed guide on transcoding H.265 to ProRes for Final Cut Pro.

Reading More...
H.265 to Avid Media Composer
H.265 Codec and iMovie
H.265 Codec and Sony Vegas
H.265 Codec and Windows Movie Maker
H.265 Codec and Premiere Pro

How to encode H.265 to ProRes for Final Cut Pro

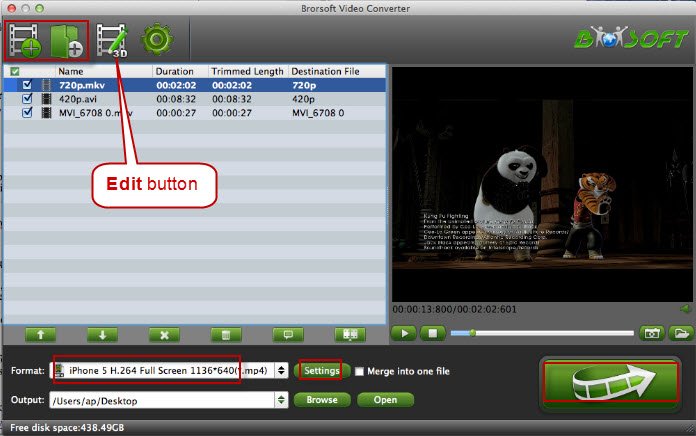
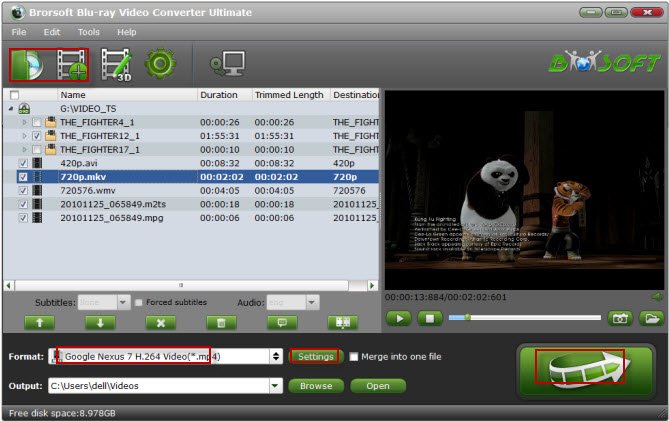
1. Import H.265 videos

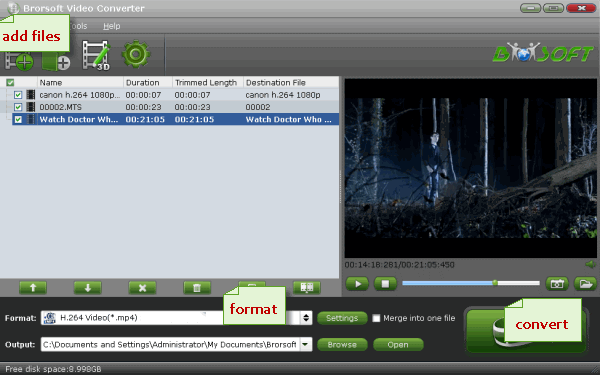
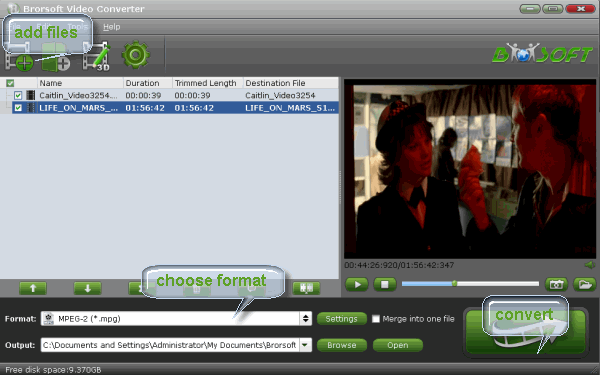
Once run the H.265 to FCP Converter, you can click "Add Video" button to load H.265 source files. Convert supports batch conversion, so you are allowed to add multiple files to convert at a time.


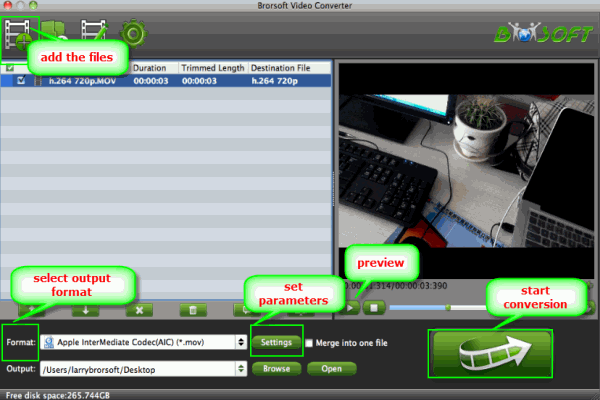
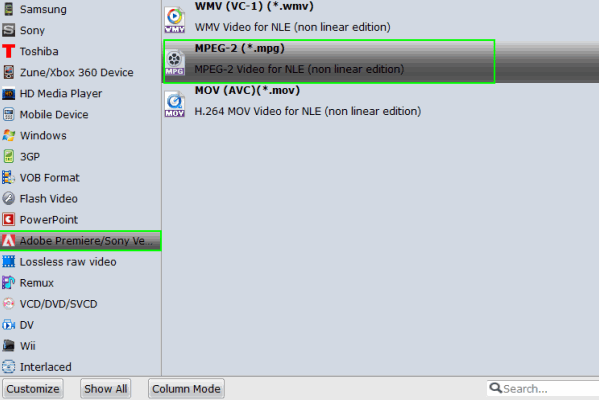
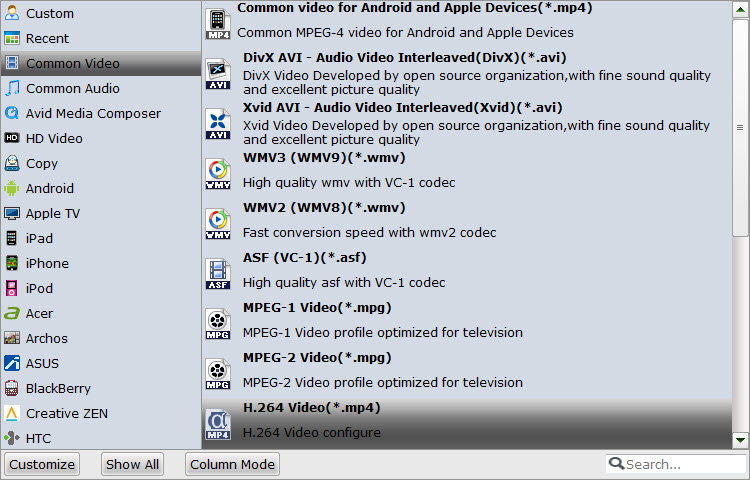
2. Select the output format

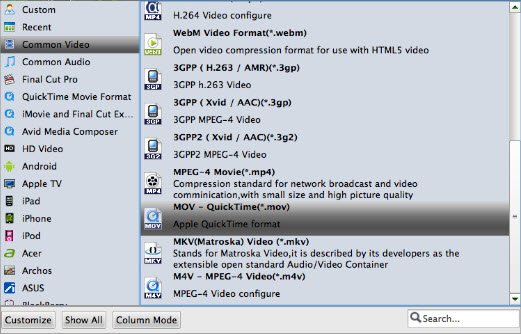
Click "format" bar and choose "Final Cut Pro -> Apple ProRes 422 (*.mov)" as Final Cut Pro X compatible codec for editing H.265 footage in FCP X smoothly. ProRes 422(HQ), Pro Res 422(LT), Pro Res 444, Pro Res 422(Proxy) are all the proper choice.


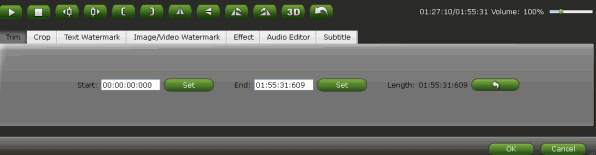
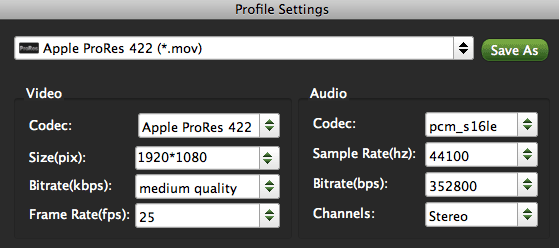
Tip: Tap "settings" to customize the output parameters- adjust the video size, bitrate, frame rate, audio sample rate, audio channel, etc to get a decent video for editing in Final Cut Pro.


3. Start H.265 to ProRes conversion

Click "Convert" button to start encoding H.265 to Apple ProRes MOV for Final Cut Pro X under Mac OS Yosemite. Once the H.265 to ProRes 422 conversion is done, you can transfer your H.265 footage into Final Cut Pro X or FCP 7 for editing smoothly on Mac with ease.

Related Guides:
H.264 Editing in Premiere Pro
Adobe Premiere Elements MOV Importing Issues- Fixed
Importing WMV to Pinnacle Studio for Editing
Losslessly Convert ProRes to WMV on Mac OS X
How to Work Android Videos in Final Cut Pro on Mac
Importing MOV to iMovie on Mac OS X El Capitan, Sierra

Wednesday, December 14, 2016

How to Import AVI files to DaVinci Resolve 9/10/11/12

This article teaches you how to import AVI files into DaVinci Resolve smoothly for film-making by converting AVI to DaVinci native DNxHD .mov video. 
avi-to-davinci-resolve.jpg

Q: "Hello I recently installed Resolve 12 and I have some AVI files i need to import. Opening the drives in the media browser i can see the folder but not the files in it. Are there any plugins i can use to add codecs to resolve?"

As far as I know, DaVinci Resolve allows full unlimited editing and grading of DPX, CIN, EXR, QuickTime, ProRes, DNxHD and MXF files all in real time, but AVI is not. If you want to import AVI to Davinci Resovle for editing, things become difficult. What we need is to find a fast way to get around the AVI files to Davinci Resolve incompatible issue.

Based on our multiple testing, we finally work out a solution to editing AVI Files in DaVinci Resolve flawlessly. In fact, it is easy, fast and worth the effort. The best way to let DaVinci Resolve work with AVI clips is to convert these AVI files to Davinci Resolve most compatible format like DNxHD. Brorsoft Video Converter is just what you want.

Overall, it is an easy-to-use yet powerful high-quality video converter, player and editor. This software can deal with almost all kinds of AVI videos. With it, users can effortlessly AVI for smoothly editing in DaVinci Resolve. What's more, it can generates more optimal editing formats/codecs for you to use in different NLE apps, such as Adobe After Effects, Adobe Premiere Pro, Sony Vegas Pro, Pinnacle Studio, Windows Movie Maker and more. For Mac users, please get Video Converter for Mac. Below is how. Just take a look at the brief guide below.

Read More:

AVI to Adobe Premiere
AVI to After Effects
AVI to Pinnacle Studio
AVI to Avid Media Composer
AVI to Windows Movie Maker
AVI to Sony Movie Studio
AVI to Sony Vegas Pro

How to convert and import AVI files to Davinci Resolve

Step 1. Install and launch the AVI to Davinci Resolve converter. Click the Add button to import your AVI videos to the program. Checking the "Merge into one file" box allows you to merge several videos into one file.


Step 2. Click the format bar and move mouse cursor "Avid Media Composer". Here we recommend the "Avid DNxHD 1080p (*.mov)" as the best video format.


Tip: You can click "Settings" button to adjust the resolution, bitrate, etc. Just customize the parameters to meet your need.

Step 3. Click "Convert" button to start converting AVI to DNxHD for importing to Davinci Resolve.

After the conversion is finished, just run Davinci Resolve and import the generated DNxHD .mov files. You will find the output video work perfectly on DaVinci Resolve 9/10/11/12.

Related Guides:
Best Ways to Convert Videos on macOS Sierra
How to Upload AVI to YouTube Easily
Transcode Avid DNxHD codec to ProRes for Final Cut Pro
Guide on Importing MOV to Avid Media Composer
Adobe Premiere Elements MOV Importing Issues- Fixed
Importing & Editing WMV Video in Final Cut Pro X
How to Use SWF Files in Final Cut Pro X/7/6

Wednesday, December 7, 2016

Transcode Avid DNxHD codec to ProRes for Final Cut Pro

A full guide teaches you how to convert DNxHD to ProRes for using natively in Final Cut Pro X/7.
dnxhd-to-prores.jpg
I have a 1080p24 video rendered out with the Avid DNxHD codec on a PC using Premiere. When I bring it over onto my Mac workstation that has FCP X and drag it onto a timeline the preview pane is just red with "Codec could not be opened". It seems that Final Cut Pro can't support DNxHD codec. I have scoured the internet, tried everything I could find about the DNxHD to FCP. The final result I found from all relevant forums is that we need convert DNxHD to ProRes for Final Cut Pro native editing.

Actually, FCP X does support DNxHD if it is rewrapped as QT/MOV and if the Avid QuickTime Codecs LT plug-in is installed. If you didn't install the plug-in correctly or got some DNxHD MXF files, a better solution is to transcode DNxHD to ProRes. Here you can complete the DNxHD to ProRes lossless conversion with the help of Brorsoft Video Converter for Mac.

Overall, the program is a professional yet all-in-one video conversion tool. With it, you can easily convert all DNxHD files to ProRes 422, ProRes 422 HQ or 4444 for using in Final Cut Pro X/7/6. Besides, the Mac video converter can convert MKV, AVI, WMV, MPG, VOB for editing in Final Cut Pro, Final Cut Express, iMovie, Avid MC, Adobe Premiere Pro etc. Some simple video editing functions like trim, crop, watermark are also provided for you. Just download it and follow the tutorial below to convert DNxHD to Apple ProRes for FCP.

Read More:

Converting DNxHD to ProRes on Mac OS X 


Step 1. Load DNxHD files

Install the DNxHD to ProRes converter program on Mac and run it. Drag the Avid DNxHD files to the software. Or you can also click "Add" button on the top of the main interface to import video to the app.


Step 2. Select output format

Hit the "Format" bar and select Final Cut Pro > Apple PreRes 422(*.mov) as output format. This format is specially designed for FCP X.


Tip: Adjust the video and audio parameters, including the Bitrate of Video & Audio, Video Size, Sample Rate, Frame Rate, Audio Channels, etc., by clicking the Settings button on the main interface for getting the best quality.

Step 3. Start conversion

Tap "Convert" button on the main interface to start DNxHD to ProRes conversion on Mac OS X. After the conversion, it is easy to import the transcoded DNxHD videos to Final Cut Pro X or FCP 7 for further editing.

Related Guides:
How to import different videos, codecs to Final Cut Pro X
Transcoding XAVC/XAVC S to ProRes for FCP
Convert AVI/MKV/MP4/MPG/VOB etc. to Apple ProRes 
Transcode H.264 videos to ProRes for Final Cut Pro

Tuesday, November 29, 2016

Video Converter for macOS Sierra- Best Ways to Convert Videos on macOS Sierra

In the past year we have show you how to convert videos on Mac OS X 10.11 El Capitan. In this article we aim to show you how to convert/encode AVI, MKV, WMV, MPG, FLV, VOB, TiVo files when you updated from El Capitan to macOS Sierra. 


Working on macOS Sierra 10.12 is full of fresh and convenience. Meanwhile, people also have a question haunting around their minds: is it available for us to convert videos on macOS Sierra the same as the former OS X? In fact, many users find that legacy video converter couldn't be port easily to this new platform. Based on this reason, we will pick up the best Video Converter for macOS Sierra for you. Read on to get it.

At first blush, there are a number of different video converting software options for Mac users. Don't know which one to choose? Well, to choose the best macOS Sierra video converter, what need to be taken into consideration is the output format range, program stability, converting speed, output quality, user customization, and user friendly level. Overall, Brorsoft Video Converter for Mac can help you achieve the goal effortlessly, which always keeps consistent update to make video conversion available on the latest operating system.

Overall, this software exceeds all the others in terms of performance, compatibility, and features. The excellent video converter for macOS Sierra 10.12 is able to convert more than 70 popular video formats AVIMKVWMV, MPG, FLV, VOB, TiVo, MTS, MXF, etc to macOS Sierra supported MOV or any other formats including professional encoders- Apple Intermediate Codec, ProRes and DNxHD, DVCPRO, HDV, MPEG-2 you want with both rather fast speed and original quality.

Besides, converting a video into a gadget-friendly version can be done easily as well, as there are pre-sets for the iPhone, iPad, iPod, Galaxy Tab, PS3, Apple TV, Kindle Fire HD and more media devices. The most important feature we'd like to stress again is that this software comes with constantly updated, so that it gives you the strong compatibility for macOS Sierra.

Download the best Video Converter for macOS Sierra:

 (Note: Click here for OS X 10.5)

thanksgiving-sale.jpg

(Brorsoft Thanksgiving Promotion 2016 - Video/MXF/MTS Converter $10 off)


Using the best Video Converter for macOS Sierra to Convert Videos with Best Quality

1. Import the video files

Import source video to the best Video Converter for macOS Sierra by directly drag and drop. Alternatively, you can click Add button to load the video files want to convert. On the right windows, you can preview your files and take snapshots of your favorite movie scenes.


2. Set output format

Click Format bar and select "MOV" or "MP4" from the "Common Video", which are fully compatible with Mac OS X. QuickTime Movie Format format is also an optimal choice.


P.S. This Video Converter for macOS Sierra also helps you to convert videos to mobile devices supported formats, such as iPhone, iPad, iPod, Samsung Galaxy, etc.

3. Start video conversion on macOS Sierra

Click "Convert" button to start converting kinds of video files to your target format. When the conversion is over, click "open" to locate the converted video files for playing, editing, sharing under macOS Sierra.

More features of the macOS Sierra Video Converter:

1. Edit Video Files> Open the video editing panel by clicking the "Edit" button and there you will be provided with many video editing features. For example, go to the "Trim" tab and drag the sliders to define the beginning and end time of the video file to cut it.

2. Video/Audio Settings> If you like, you can click "Settings" to change the video encoder, resolution, frame rate, etc. as you wish. Keep in mind the file size and video quality is based more on bitrate than resolution which means bitrate higher results in big file size, and lower visible quality loss, and vice versa.

P.S. Your macOS Sierra works slow? Here are some tricks to speed up macOS Sierra.

Related Guides:
Best H.265 Encoder and Decoders
Apple ProRes Converter Windows
Top 5 Free Video Converter for Mac
Top 5 Free Video Converter Wins
Best XAVC/XAVC S Converter

Monday, November 21, 2016

2016 Thanksgiving Deals- Brorsoft Video Converter $10 off

On Thanskgiving Day, Brorsoft Studio offer 20% discount off for its top-selling video converting tool- Brorsoft Video Converter. Get the $10 coupon code now! 


Thanksgiving is coming. On the special holiday, Brorsoft Studio presents thanks to our customers. Besides, Brorsoft Studio also prepared a big gift for all of you – Thanksgiving Promotion to celebrate the great day. Focusing on product quality and customer needs, Brorsoft offers up to $10 off Coupon code for hot products- Brorsoft Video Converter(Windows/Mac) to reward our customers.

Overall, Brorsoft Video Converter allows you not only to convert a wide range of UHD 4K, HD and SD videos regardless of formats, but also lets you convert those downloaded or homemade videos to any popular video and audio formats for play and share anywhere you like. It supports more than 70 input formats and up to 250+ output file format. Supported output video and audio formats include H.265, MP4, MOV, WMV, AVI, XAVC, XAVC S, MPEG, VOB, TiVo recordings, MXF, MTS/M2TS, FLV, 3GP, 3G2, DivX, XviD, MP3, WMA, WAV, AAC, AC3, M4A and more.

It supports 150+ presets for popular devices like the iPhone (including iPhone 7, iPhone 7 Plus, iPhhone 6 Plus and iPhone 6), iPad, Android devices, Windows-based tablets and game console like PS4Xbox One, etc. This video to devices converter will change video to the correct sizes and formats for your devices and other media players. With it, you can watch any media files on your mobile devices on the go.


Original Price: $45.95

Now: $35.95
store-little-buy-win.png


Original Price: $45.95

Now: $35.95

store-little-byu-mac.png

If you have any question, please feel free to contact us for online support.

Wednesday, November 16, 2016

How to Work XAVC from Sony PXW-X70 in Adobe Premiere Pro

There are a few issues when it comes to editing Sony PXW X70 XAVC files in Adobe Premiere Pro or other NLEs. The article offers some tips and tricks for importing Sony PXW X70 XAVC videos in Premiere Pro CC/CS6/CS5 flawlessly. 


Sony's PXW-X70 records HD video using the XAVC Long-GOP codec with 4:2:2, 10-bit color sampling at 50 Mb/second, providing footage with a high data rate that is suitable for broadcast applications. After recording, most users plan to import Sony PXW-X70 XAVC into Premiere Pro for editing. Stuck in the issue? Don't worry. This article will teach you how to edit Sony PXW X70 XAVC files in Adobe Premiere Pro CC/CS6/CS5 freely.

As some guys recommend online, in order to load Sony X70 XAVC flies into Premiere Pro for smooth editing, it would be better update Premiere program to the latest version. I’ve tried the trial version of Premiere Pro CC, same result- can’t get XAVC viewed in timeline. Alternatively, another solution is to get third-party software like Brorsoft Video Converter for Mac to convert XAVC to Premiere Pro natively supported format like MPEG-2. It will save all the issues.

Overall, the program is the best XAVC converter under Mac OS X(Sierra, El Capitan, Yosemite, Mavericks included). With it, you can effortlessly transcode XAVC to MPEG-2 or MOV, which will create a Premiere Pro friendly file format keeping the original quality. Besides Premiere, this software can also export DNxHD for Avid, ProRes for FCP, AIC for iMovie/FCE and more NLE systems for native editing. For Windows users, you can turn to Video Converter. Just get the right version according to your computer's OS and follow the step-by-step guide below to convert Sony PXW X70 XAVC videos to Adobe Premiere Pro easily.

How to convert Sony PX70 XAVC to MPEG-2 for Premiere Pro CS4/CS5/CS6/CC

Step 1: Load source XAVC files

Launch the XAVC Converter on your Mac, and you can either click “Add” button to import xavc files, or directly drag and drop the files into this program.


Step 2: Select output format

To import XAVC files to Adobe PP, you can follow Adobe Premiere/Sony Vegas column and select MPEG-2 (*.mpg) as output format.


Tip: If the default settings do not fit you requirement, you can click “Settings” icon to and enter “Profile Settings” panel to adjust video size, bit rate, frame rate, sample rate and audio channels.

Step 3: Start XAVC conversion

Finally, press the convert button; it will start to transcode Sony PXW-X70 XAVC files to MPEG-2 for Adobe Premiere Pro CC, CS6 as well as CC, CS5, CS4 immediately. When the conversion is finished, you can click “Open” button to get the resulted videos.

Additional Tips:

This powerful XAVC to Adobe Premiere Converter not only can help you convert XAVC to Premiere, but also enables anyone with XAVC or XAVC S files to use in any non-linear editor like After Effects, Final Cut Pro, iMovie, FCE, Avid Media Composer, etc as long as transcode XAVC to a recognizable format.

Related Guides:
HGet Avid Media Composer Read and Accept XAVC S from Sony A7S II
How to Convert 4K XAVC to MOV for Mac
Importing Sony PXW-FS7 XAVC Intra to Adobe Premiere Pro
Solve Sony FS5 4K XAVC-L codec in Adobe Premiere CC Issue
Edit Sony RX10 II XAVC S in PowerDirector
Importing MOV to iMovie on Mac OS X El Capitan, Sierra
Encoding XAVC to ProRes for Final Cut Pro
Editing 4K XAVC to PowerDirector Smoothly
Using Sony a6500 XAVC S in Avid Media Composer

Friday, November 11, 2016

How to Upload AVI to YouTube Easily

This tutorial offers a simple way to help you upload and share AVI files on YouTube without anhh problem. 


Let's go to the point: if you want to upload AVI file to YouTube, what would be the best way to go about it? Just read on this article. We will share the tips and tricks for uploading and sharing AVI on YouTube in the simplest way.

Searching online, we found many guys are facing the similar troubles "YouTube won't accept AVI files"... In fact, YouTube clearly announce AVI is one of YouTube supported video formats, but AVI is a container format. The video and audio streams stored in different AVI files may be encoded in different ways. YouTube just only recognizes the specific way that the audio and video streams of AVI files are encoded in. So, if your AVI files can't be accepted by YouTube, it may probably be the video & audio codec problem.

To add AVI movies to YouTube without any hassle, a suggestion is to use Brorsoft Video Converter to transcode AVI to YouTube most compatible format like .mov, .mpeg4, .3gp. With this AVI to YouTube video converter, you not only can convert AVI video to FLV, MOV, WMV, MPEG-4, compatible with YouTube, but also can divide your large AVI files into shorter 15 min sections( YouTube has a 15 min limit in usual.) And if you are a Mac user, please get Brorsoft Video Converter for Mac, which helps you convert and upload AVI video to YouTube on Mac OS X(Yosemite, El Capitan, Sierra included).

Guide: How to convert AVI to YouTube format

Step 1. Import AVI files

Lunch the AVI converter; drag & drop .avi files to it. Or click the Add video button to locate the files you want to add. Note that batch conversion is supported so you can add as many files as you like at one time.


Step 2. Select output format

Click Format bar to select an output format. To share your AVI movies on YouTube, .3gp, .flv, .mov format from Common Video are all the proper formats. You can also press the Settings button to adjust the video size, bitrate, frame rate, audio sample rate, etc to optimize the quality.


Step 3. Edit AVI for YouTube(optional)

Click Edit button and you can trim, crop or adjust the video with the built-in video editor to get the very part and effect of the movie you want. And if the video clips you've trimmed are still longer than 15 minutes, you can choose to split the AVI video into smaller parts so as to share on YouTube without limit.


Step 4. Start the conversion

Click "Convert" button to start converting AVI video for uploading to YouTube.

After the conversion, click "Open" button to get the exported files and then upload the converted AVI files into YouTube for sharing with your friends, families, and fans.

Related Guides:
Could I upload an MKV file on YouTube?
How to Deinterlace Video for Vimeo, YouTube
OBS files won’t upload on YouTube- A quick fix
Any way to upload and share 4K video on YouTube
Convert and Upload H.265/HEVC Videos to YouTube
Basic Steps to Upload Gopro Hero5 4k Video to Youtube
Upload XAVC S to Youtube with Best Settings 

Wednesday, June 15, 2016

How to Get Avid Media Composer Read and Accept XAVC S files from Sony A7S II

To get Avid Media Composer and Sony A7S ii 4K XAVC S video to play nicely, the easy workaround is to convert XAVC S to Avid MC compatible codecs. Here is how.

”Hi, I’m trying to import video recordings from the new Sony a7s II to Avid MC6. The camera uses a flavor of MP4 that is called XAVC-S. I have tried the traditional importing method, but there’s no go. I have also tried the AMA plug-in created by Sony, unfortunately, it doesn’t seem to support Sony a7s II XAVC-S footage. Does that mean I have to use 3rd party software to convert formats? If so, does anyone know of a good XAVC-S Converter that is worth trying?’"

As the above said, Sony has created a special free of charge AMA plug-in for Avid which provides support for XAVC and XDCAM/XDCAM HD files in Avid Media Composer. However, XVAC S is not currently supported natively by Avid Media Composer. To fix the issue, a quick workaround is to convert XAVC S to Avid MC 4/5/6/7 more "edit" friendly codec DNxHD.


Brorsoft Video Converter for Mac is highly recommended here. The program is an easy-to-use yet professional XAVC S Converter for Mac. It's able to convert XAVC S files from Sony A7S II to Avid Media Composer more compatible DNxHD .mov video. With it, you may also encode XAVC S/XAVC to Final Cut Pro, Adobe Premiere Pro, FCE, iMovie and more NLE programs highly compatible formats for editing. If meet the XAVC S codec issues on Windows PC, please get Brorsoft Video Converter to solve the problem.

More Reading...

How to transcode H.265 to H.264 on Mac?
Converting XAVC to ProRes 422 MOV for Final Cut Pro
Convert Sony FDR-X1000 XAVC S footage for Editing in FCP

How to Transcode Sony A7S II XAVC S 4K Video to DNxHD for Avid Media Composer Professional Editing?

Step 1: Install and run the XAVC S Video Converter on your Mac, then run it. Click on “Add”, and browse your files; select all the XAVC S files you wanna convert. If you want to combine all the files together for easy importing to FCP, please tick the box “Merge into one” on the main interface.


Step 2: Click Format on the main interface and choose Avid Media Composer > Avid DNxHD(*.mov) as output format. It ensures the best quality while working with the output files in Avid.


Step 3: Click the "Settings" button and set proper video/ audio parameters. You can reset set the video size, bitrate and frame rate, audio sample rate, audio channel. If you would like to use default settings, simply skip this step.

Step 4: When you finish all settings, click the "Convert" button to start the XAVC S to DNxHD .mov conversion.

After the conversion, you can click "Open" button to get the generated DNxHD .mov files effortlessly. Now, it's much easy for you to add Sony A7S II XAVC S files to Avid Media Composer 5/5.5/6/6.5/7 for further editing.

More Topics:

XAVC S to Adobe Premiere
XAVC S to Sony Vegas Pro
XAVC S to ProRes Converter
XAVC S to Windows Movie Maker
Edit Panasonic GX85 4K videos with After Effects
Import Panasonic GX85/GX80 4K Video to iMovie
Editing Sony A6300 XAVC S files in FCP/iMovie/FCE
Convert Sony Alpha A7s Mark II footage into FCP 7/X
Get the VLC alternative to play 4K video in Mac El Capitan
Enable XAVC S 4k files From Sony A6300 to Davinci Resolve
Import and Convert Sony PXW-X180 XAVC to Final Cut Pro 7
Import Panasonic Lumix GX80/GX85 footage to Work on Mac OS X

Friday, May 13, 2016

Edit Fraps AVI files in Sony Vegas Movie Studio 10/11/12/13 with MPEG-2 Codec

The easy workaround to get Sony Movie Studio work with Fraps AVI files is to convert Fraps AVI to MPEG-2 codec, which ensures the best results when using in Sony Vegas Movie Studio 10/11/12/13.

Fraps (derived from frames per second) is a benchmarking, screen capture and screen recording utility for Windows. It's commonly used for measuring a computer's performance when playing games as well as capturing and recording gaming images. And according to its spec, the video recorded from Fraps is with the extension of .avi at up to 7680x4800 with custom frame rates from 1 to 120 frames per second. After recording some Fraps videos, chances are you want to edit Fraps AVI on Sony Vegas Movie Studio to make them more stylish.

But, even some Fraps AVIs can be accepted, but no video or audio comes with. If you are also in the trouble, seek for the solution below. We will give you some hints.


A quick fix to solve the issue is to convert Fraps AVI video files into a more common video codec like MPG that Vegas Movie Studio can read easily. You can get help from Brorsoft Video Converter. The program is an easy-to-use Fraps AVI converter for you, which can help you change Fraps videos into a different format like MPEG-2 with least quality loss. You should then be able to import the new file into Movie Studio with smooth editing without any trouble. It will ensure a perfect Fraps AVI file importing, playing and editing workflow with Sony Vegas Movie Studio 10/11/12/13.

READ MORE: Editing XAVC S in Sony Movie Studio | Fix Sony Movie Studio MOV Problems | Editing MP4 in Sony Movie Studio


How to Convert Fraps AVI for Editing in Sony Movie Studio smoothly

Step 1: Run AVI to Sony Movie Studio Converter, and then click the "Add" button to load the Fraps .avi videos. Check the "Merge into one" box, you can join several Fraps AVI clips together.


Step 2: Click "Format" bar and choose "Adobe Premiere/Sony Vegas > MPEG-2 (*.mpg)" as output format on the drop-down menu.


Tip: Click the Settings icon to adjust video and audio parameters on the Profile Setting as you need to get the best quality video.

Step 3: Simply click the "Convert" button to start converting Fraps AVI for Vegas Movie Studio and everything else will be automated.

When the conversion is finished, you can click "Open" button to get the generated MPG files effortlessly. Now, it's much easy for you to import Fraps AVI files to Sony Vegas Movie Studio 10/11/12/13 for further editing.

More Topics:
How to import AVI files into iMovie
Guide to importing AVI files into Premiere Pro
How to import AVI to Windows Movie Maker
Add and edit MOV in Windows Movie Maker
Join Several AVI Video Files into a Single File
Import FLV to Sony Movie Studio 13/12/11/10
Download Best alternative to MakeMKV for Mac
Fastest Blu-ray Copy Software on Mac(El Capitan)
Convert Sony CX455 XAVC S to iMovie friendly video types
Convert MXF to Pinnacle Studio 14/15/16/17 friendly formats
Convert MPG and Import MPG files into Windows Movie Maker

Thursday, April 28, 2016

DJI 4K Workflow with Resolve-Import DJI OSMO 4K files to Davinci Resolve 9/10/11/12

DJI OSMO Handheld cameras and Davinci Resolve workflow - how to convert DJI OSMO 4K MP4/MOV to Davinci Resolve 9/10/11/12 editable format?

With the OSMO, what you essentially get your hands on is a gimbal-mounted 4K UHD Steadicam rig but without the drone that such a shooter would normally attach to. Of course, this is also a bit of a simplification since the OSMO isn’t just a regular drone-mounted 4K camera and gimbal without the drone. Instead, it’s an entire hand-held system with its own specific features and controls which are completely customized for being taken around by hand by users who want steady, stable and crystal clear UHD and Full HD video in a hand-held device.

In this, the OSMO excels and in addition to its great shooting specs, offers a remarkably robust physical handling package.

However, there are some problems such as not showing the video but audio only, unsupported file type when playing & editing DJI OSMO video in Davinci Resolve, especially in 4K. So, how to work with DJI OSMO 4k MOV/MP4 video to Davinci Resolve beautifully?


For you knowledge, according to Davinci Resolve's spec, it has certain requirements for input video formats, not all video formats are accepted by Davinci Resolve well. In addition, although Davinci Resolve has boasted the capacity to handle with 4K files without much problem, it is extremely hardware intensive especially for working on a old computer. In view of this, you're highly suggested to convert DJI OSMO 4K to Davinci Resolve's preferable video format like DNxHD codec(1080p would be the best settings.).

To achieve the goal, a professional 4K Video Converter is the key and Brorsoft Video Converter for Mac is the most ideal choice for you. Developed with the most advanced converting technology, this 4K video converter truly and fully supports input and output videos at upto 4K resolution. With it, you can import 4K UHD to Davinci Resolve, iMovie, FCP, Avid, After Effects, Premiere Pro, etc for professional editing. Moreover, it can help you freely enjoy your 4K videos/movies, 4K YouTube clips, 4K camcorder recordings wherever you like, such as watching 4K movies (in any format) on 4K TV and even on mobile devices. If you are working on Windows(Windows 10 included), please turn to Brorsoft Video Converter. Download the tool and start the DJI OSMO 4K to Davinci Resolve video conversion.

Download 4K DJI OSMO to Davinci Resolve Converter:

(Note: Click here for OS X 10.5)

More Reading...
Work with MOV clips in Winodws Movie Maker
Rip Disney (3D) Blu-ray Effortlessly in Windows/Mac
How can i convert H.265 to 1080P H.264 Encoded Video
Convert Canon 80D H.264 MOV to EDIUS for Editing Smoothly
Convert Panasonic MTS M2TS Files to Davinci Resolve Format

Guide: How to convert and import DJI OSMO 4K MOV/MP4 files to DaVinci Resolve
Step 1. After downloading, install and run this 4K Video Converter for DaVinci Resolve, just copy the 4k MOV/MP4 files from your DJI OSMO Handheld 4k cameras to your hard drive. Import the files to the software for converting.


Step 2. Hit Format bar to select output format. You can choose Avid Media Composer > Avid DNxHD(*.mov) as output format. It is an ideal editing format for Resolve. Of course, you can also click "Common Video" > "MOV - QuickTime (*.MOV)" as the target format.


Step 3. Finally, hit the big Convert button on bottom of the main windows and the conversion from DJI OSMO 4K MOV/MP4 to DaVinci Resolve will begin immediately.

More features of the DJI 4K to DaVinci Resolve converter:

1. Adjust audio and video settings (optional)
The DJI 4K Video file converter enables users to adjust audio and video settings before start conversion. Click “Settings” button, then you will enter the following interface, on which you are allowed to customize size, bit rate, frame rate, sample rate, and audio channel to your required ones.

2. Basic video editing (optional)
This Mac video converter has some simple edit functions like cropping, splitting, adding effects etc. so you can touch up the video with basic video editing functions.

After the conversion is complete, get the resulted files via clicking the Open button and then you can import converted DJI OSMO 4K files to DaVinci Resolve 9/10/11/12 for further editing without any hassle.

More Topics:

4K Downscaling to 1080p
4K workflow with Sony Vegas
4K Workflow with After Effects
Losslessly Convert Blu-rqay ISO to MP4
Can't Open iPhone media in Edius 6/7/8?
Insert DVD Collections to Sony Movie Studio
Restore iPhone contacts from iCloud selectively
Smoothly Edit MOV files in Premiere Elements
Import & Edit Sony Action Cam clips in Sony Vegas
Basic steps to upload a 4K DJI OSMO video YouTube
Easy steps to import MTS videos to iPhone on Mac OS X
Convert DNxHD MXF Files to MPEG-2 for After Effects CC/CS 6

Monday, March 28, 2016

Canon EOS 80D to EDIUS 5/6/7/8–Convert Canon 80D H.264 MOV to MPG work with Edius

So want to convert Canon EOS 8OD MOV to EDIUS but don't know how to do it? It's resolved here.

Q: How to work on EOS 80D MOV files ?
"Hi
Would you please help me? I have some MOV files from Canon EOS 80D and I want to edit them, I tried it with Edius 4.6 but as you know it didn’t import them, what should I do? Is there any way to work on MOV files in Edius? Procoder also doesn’t recognize MOV files, I don’t know what I should do.
I really appreciate any help."

As Edius claimed some wrappers like MOV (QuickTime) are supported by EDIUS, but as far as we know, it not includes all codecs.From Canon EOS 80D user manual or its product page, you may have known that Canon EOS 80D recorded videos are in H.264 codec, the H.264 codec is not an ideal codec for editing, if you want to edit these MOV videos with EDIUS 5/6/7 smoothly, you will need to convert videos from Canon EOS 80D to EDIUS native supported codec MPG format, and then you can edit Canon EOS 80D files with Edius smoothly.


You can get help from Brorsoft Video Converter.

The program is an easy-to-use MOV converter for you, which can help you change all kinds of MOV videos into a different format like MPEG-2 with least quality loss. You should then be able to import the new file into EDIUS with smooth editing without any trouble. It will ensure a perfect MOV file importing, playing and editing workflow with EDIUS 5/6/7. Besides MOV, this video converter can also transcode AVI, MP4, FLV, MKV, etc to EDIUS. Download the program and learn the step-by-step guide.

READ MORE: How-To: Import MOV files to Sony Vegas | Load MOV files to Pinnacle Studio

Download MOV to EDIUS converter:


How to Convert Canon 80D H.264 MOV to EDIUS for Editing Smoothly

1. Launch the MOV to EDIUS Converter, you can click "Add" button to load source files. It supports batch conversion, so you are allowed to add multiple files to convert at a time.


2. Click "Format" bar and choose "Adobe Premiere/Sony Vegas > MPEG-2 (*.mpg)" as output format on the drop-down menu. Of course, you can also choose MPEG-4, WMV from "Common Video" as the output format.


Tip: Click the Settings icon to adjust video and audio parameters on the Profile Setting as you need to get the best quality video.

3. After all settings, hit Convert button to start transcoding EOS 80D MOV for EDIUS with the best MOV file converter.

Once the conversion is completed, click "Open" button to find the generated videos, and then you can transfer the converted EOS 80D MOV files to EDIUS 5/6/7 easily and quickly.

More Topics:

How to transcode 4K DNxHR to H.264 on Mac?
How to Convert VOB to MOV on Mac Easily and Fast
Convert AVI files for Editing in Windows Movie Maker
Converting Nikon D7100 MOV footage for Final Cut Pro
Edit Sony a7s II 4K recordings in Davinci Resolve on Mac
Import Canon 80D H.264 MOV files to Davinci Resolve 11
Recover iPhone Contacts after Restoring to Factory Settings
Make Sony PXW-X70 XAVC Accepted by Davinci Resolve
Import Canon EOS 80D H.264 MOV video to FCP 7, FCP X
Convert and Import Canon 80D MOV files to Sony Vegas Pro
Import Canon EOS 80D H.264 MOV/MP4 files to Pinnacle Studio
Workflows to play, edit, convert 4K Ultra HD videos in Windows/Mac

Thursday, March 24, 2016

Blu-ray to MP4 - Rip/Convert Blu-ray to MP4 Losslessly

Summary: If you want to convert Blu-ray to MP4 so as to play, edit or share you Blu-ray movies more covenietly, now just follow this article to finish the conversion while reserving the original video quality.

MP4 is one of the most widely used format that is accepted by most devices, media players and video editor software. It has a good compromise between video quality and file size. Therefore sometimes people need to convert Blu-ray to MP4 to enjoy movies on the go or share with others. This guide will show you how to do that within only 3 steps.

In fact, you can get Blu-ray to MP4 task done easily and quickly with the right program. Here Brorsoft Blu-ray Ripperis recommended as the best Blu-ray to MP4 converter for you to get MP4 video from Blu-ray disc with fast ripping speed and high video quality. With full Blu-ray supports, it is capable of removing AACS and BD+ copy-protections as well as converting Blu-ray to all other regular video formats like MKV, AVI, WMV, MOV, FLV, WMV, etc. Moreover, video editing functions like clip, rotate, add watermarks, adjust video effects, etc. are provided. The equivalent Mac version is Blu-ray Ripper for Mac which is able to convert Blu-ray to MP4 on Mac OS X (Mavericks included). Now free try the Blu-ray to MP4 ripper and follow the guide to accomplish the conversion.

How to Convert Blu-ray to MP4 without quality loss

1. Add Blu-ray movies

Install and launch the best Blu-ray Ripping program. Insert your Blu-ray disc into your BD drive, and click "BD/DVD disc" icon to load your Blu-ray movies. You can also import movies files from Blu-ray folder, ISO. Soon after loading, you will find all titles and chapters for the Blu-ray disc. You can select preferred subtitles and audio track.


Step 2. Select MP4 output format

Click Format bar and select MP4 format as the output format from the drop-down list of "Common Video". As you see, you can either choose "H.264 Video(*.mp4)" or "MPEG-4 Movie(*.mp4)" as output format.


If you want to convert your Blu-ray movies for play on portable devices, including iPhone, iPad, iPod, HTC, Samsung, Nokia, Samsung, Sony, PSP, Xbox 360 and more, you can simply browse to find the preset of your device from corresponding device catergory and select it as the output format to get videos with optimized settings.


Tips: Adjust video/audio Settings (Optional)
If you want to customize output video quality in further, click Settings button to customize video quality like resolution, frame rate, bit rate, audio channel, etc.

Step 3. Start ripping Blu-ray to MP4

Click "Convert" to start to change Blu-ray to MP4. After that you can click "Open" to find out where the output files are saved. If you want to set where you to save the output files, click the "Output Folder" drop-down list to set it before the conversion.

More Topics:

Handbrake Rip Blu-ray
Copy Full Blu-ray Disc
Convert Blu-ray to MKV
Rip Blu-ray with forced subs
How to Join VOB Files Quickly and Easily
How to Recover iPhone Contacts without backup
Convert and Copy Blu-ray movies to iTunes Playback
How to Convert AVI to MOV on Mac OS X with ease
How to Play 3D Blu-ray movies on Archos VR Glasses
How to Recover Text Message from iPhone without backup
Convert MKV to Zeiss VR One for playback with 3D effect
Convert video to M3U8 with this free and fast online converter
Convert DVD to iPhone 7/iPhone 7 Plus with a few simple clicks

Thursday, March 17, 2016

How can i convert 4k HEVC (H.265) to 1080P H.264 Encoded Video (Windows 10 & El Capitan) ?

There are a lot of people who have got some H.265 videos in hand wanna convert H.265 to H.264, this tutorial will teach you how to convert 4K H.265 (HEVC) files to H.264 MP4 so that you can play your 4K H.265 (HEVC) files on Mac (El Capitan), Windows (10) widely.

Source From: How to transcode H.265 to H.264 on Mac?

High Efficiency Video Coding, abbreviated in HEVC, also known as H.265, is a successor to currently most commonly used video compression format H.264, which is said to double the data compression ratio compared with the previous. Video encoded with HEVC will maintain the high visual quality, but at a smaller file size. Compared with the H.264/MPEG-4 AVC High profile, the average bitrate reduction for HEVC was 52% for 480p, 56% for 720p, 62% for 1080p, and 64% for 4K UHD.

Though popular as it being for its higher definition and smaller size, as a new codec, many multimedia players and video editing tools don’t keep the pace with the codec. So sometimes, you need to change H.265 to H.264 video format so that you are able to play, edit or share your H.265 videos in your devices freely and easily.


Perhaps you are getting confused about how to complete your H.265 to H.264 conversion, well there is a productive way to facilitate and advance the H.265/HEVC to H.264 video conversion process, by using a best H.265 video converter – Brorsoft H.265 Video Converter for Mac (also ranked as one of the top 3 H.265/HEVC Encoding and Decoding Tools). The equivalent Windows version is Brorsoft H.265 Video Converter. They can transcode MP4, MKV, AVI, FLV and other video formats in H.265 to H.264 video but also convert SD/HD videos (AVCHD, M2TS, MTS, MKV, H.264, MP4, AVI, TS, MOD, TOD, WMV, MOV, MPEG, etc.) to H.265 with several mouse clicks.

How to transcode H.265 to H.264 on Mac?

Step 1. Import H.265 video files.

Run the H.265 Video Converter program, go to the menu bar, select Add button to select the H.265 files you want to import. You can also directly drag the video files to the program for conversion. It supports batch conversion so you can import multiple files at a time.


Step 2. Choose target format

Click “Format” bar to open the format profile list, you can choose H.264 video from “Common Video” and “HD Video” categories. Each category contains many format, like MP4, MOV, AVI, etc. You can choose any one you need. Here, we take H.264 MP4 as instance.


Tip: You are allowed to adjust video and audio parameters if you are not satisfied with the default settings. Presets like size, bitrate, frame rate, audio channels, etc. can be customized in your own way.

Step 3. Start transcoding H.265/HEVC video files to H.264/AVC MP4

Now hit on the “Convert” button on software main interface to start the H.265 to H.264 conversion. When it finished, just open the output folder to find the generated video.

Now you can watch or edit the H.264 MP4 video on your multimedia devices or video editing tool.

More Topics:

Rip DVD to Store or View on Dropbox
Merge multiple AVI movies into One File
How to merge MKV files into 1 single file
Best Mac MTS to MOV Converter Review
Compresses Blu-ray videos to MKV Playback
Can't Import/Read/Open MP4 in iMovie 11/09/08
Best way to join multiple FLV files into a large one
How to Convert VOB files to Windows Movie Maker
How to Convert AVI to MOV on Mac OS X with ease
Convert and Copy Blu-ray movies to iTunes Playback
Convert MKV to Zeiss VR One for playback with 3D effect
Convert video to M3U8 with this free and fast online converter
Import Sony 4k XAVC (S) footage into Premiere Pro CC/CS6/CS5/CS4

Sunday, March 13, 2016

Solve AVI File Stuttering/Shaking Problems in Pinnacle Studio 14/15/16/17/18

Are you looking for an easy, quick and affordable way to seamlessly convert AVI file to MPEG-2 so that you can solve stuttering/shaking problems with Pinnacle Studio? Consider it done. 

Source From:Convert and Import AVI files to Pinnacle Studio 14/15/16/17/18 

Q: Do you know why I can't Import some .avi video files into Pinnacle Studio? 
"I have an AVI file that I really want to import into Pinnacle Studio 18, but it keeps rejecting it." 

Not all .avi videos are the same and some use Video Codecs that are not supported by Pinnacle Studio. Examples of some formats/codecs that Pinnacle cannot read are DivX and Xvid. 

Best Solution: 
Convert your AVI video files into a more common video codec that Pinnacle Studio can read easily or record your original video files using a codec/format that Pinnacle already likes. 


To make AVI video files to work well with Pinnacle Studio, Brorsoft Video Converter Ultimate is highly recommended to transcode AVI to Pinnacle Studio native format- MPEG-2. No matter what version of the NLE apps you are applying, and what Windows system you are working on, this video converter will assist you to import AVI as well as MOV, MTS, MKV, MPG, etc clips to Sony Vegas Pro, Adobe Premiere Pro, Pinnacle Studio, Windows Movie Maker, etc for editing smoothly. Follow its step-by-step instruction below to learn how to convert AVI to MPEG-2 for Pinnacle Studio. 

Download AVI to Pinnacle Studio Converter: 

 
How to Convert and Import AVI files to Pinnacle Studio 14/15/16/17/18 

Step 1. Load AVI files 

Click "Add" button on the main interface to load your AVI files once you set up the professional AVI to Pinnacle Converter on your PC.(Drag & Drop function is included.) 


Step 2. Set Pinnacle Studio supported format 

Click "Format" bar to determine output format. Follow "Adobe Premiere/Sony Vegas" and select "MPEG-2(*.mpg)" as the output format. 


Tip: Video/Audio quality settings 

Adjust video and audio parameters, including the Bitrate of Video and Audio, the Codec of Video and Audio, Video Size, Sample Rate, Frame Rate, Audio Channels, etc., in the Profile Settings. 

Step 3. Start conversion 

Click "Convert" button to finish the WMV to MPG for Pinnacle format conversion. 

When the conversion task is finished, click "Open" button to get the exported files and then import the converted AVI clips into Pinnacle Studio 14/15/16/17/18 to do further editing. 

More Topics: 

AVI to Sony Movie Studio 
AVI to Avid Media Composer 
AVI to Windows Movie Maker 
How to Join VOB Files Quickly and Easily 
Upload XAVC files to YouTube for Sharing 
Imoport MOV files to PowerDirector 11/12/13 
Convert and Import WMV files to Pinnacle Studio 
Encoding MP4 files to MPEG-2 for Pinnacle Studio 
Import VOB files to Pinnacle Studio 14/15/16/17/18 
Encoding 4K videos files to MPEG-2 for Pinnacle Studio 
Converting WebM format to MPEG-2 for Pinnacle Studio editing 
Convert MKV files for Editing in Pinnacle Studio 14/15/16/17/18 
4K MXF/MP4/MOV/XAVC/XAVC S files to MPEG-2 for Pinnacle Studio